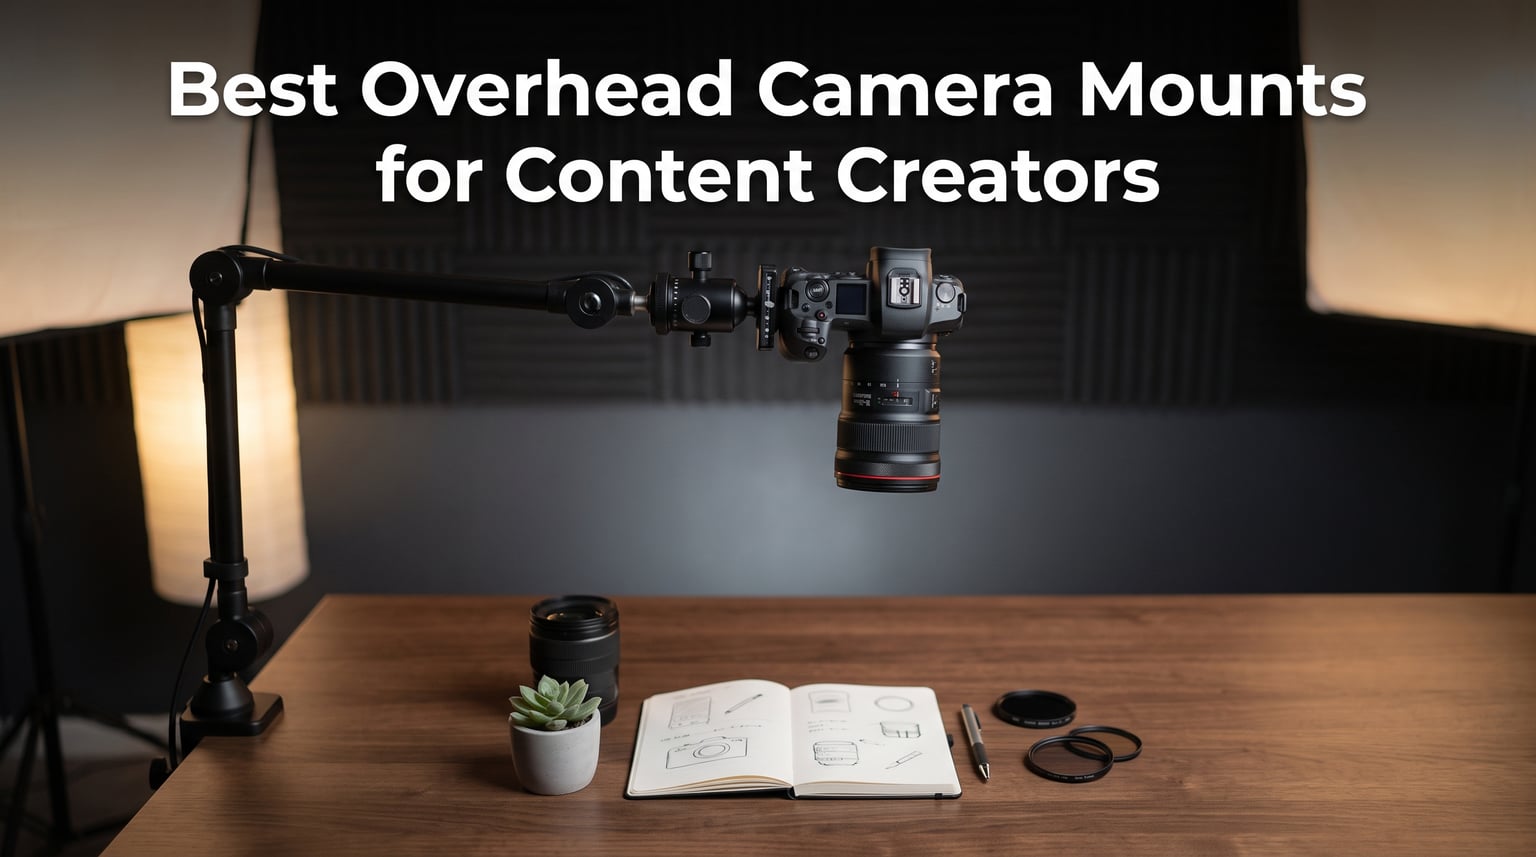
I spent three months testing overhead camera mounts for everything from product photography to cooking tutorials, and I learned one thing fast: the wrong mount will ruin your shoot before you even press record. Wobbling arms, tipping bases, and flimsy clamps are the complaints I see most from creators on Reddit’s videography and YouTube communities. When your camera drifts mid-shot or the whole rig collapses onto your workspace, you lose hours of re-shoots.
That is exactly why I put together this guide to the best overhead camera mounts for content creators in 2026. Whether you shoot flat lay photography with a DSLR, stream cooking videos with your phone, or film unboxing tutorials with a webcam, the right overhead mount changes your entire production quality. I tested each of these eight mounts with real cameras, phones, and lighting setups to see how they actually perform under pressure.
Before we get into the reviews, I want to mention that pairing your mount with the right practical lights for filmmakers and a solid action camera setup will take your overhead content to the next level. Now let us find the mount that fits your studio and your budget.
Table of Contents
Top 3 Picks for Best Overhead Camera Mounts for Content Creators
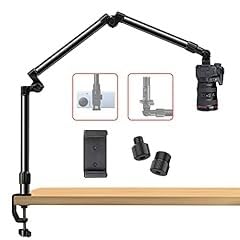
DNSbabi 3-Section Articulating Metal Arm
- 18lb load capacity
- 360-degree rotation
- Gear-locking joints


Best Overhead Camera Mounts for Content Creators in 2026
| Product | Specifications | Action |
|---|---|---|
| DNSbabi 3-Section Articulating Metal Arm |
|
Check Latest Price |
 JUSMO LS15 Pro Camera Desk Mount JUSMO LS15 Pro Camera Desk Mount |
|
Check Latest Price |
| DImotliyor 3-Section Flexible Arm |
|
Check Latest Price |
 UBeesize 360 Degree Adjustable Arm UBeesize 360 Degree Adjustable Arm |
|
Check Latest Price |
 InnoGear Overhead Phone Mount InnoGear Overhead Phone Mount |
|
Check Latest Price |
| yAyusi Heavy Duty Phone Mount |
|
Check Latest Price |
 LUXSURE Ring Light with Stand LUXSURE Ring Light with Stand |
|
Check Latest Price |
 HVAYING Overhead Phone and Camera Mount HVAYING Overhead Phone and Camera Mount |
|
Check Latest Price |
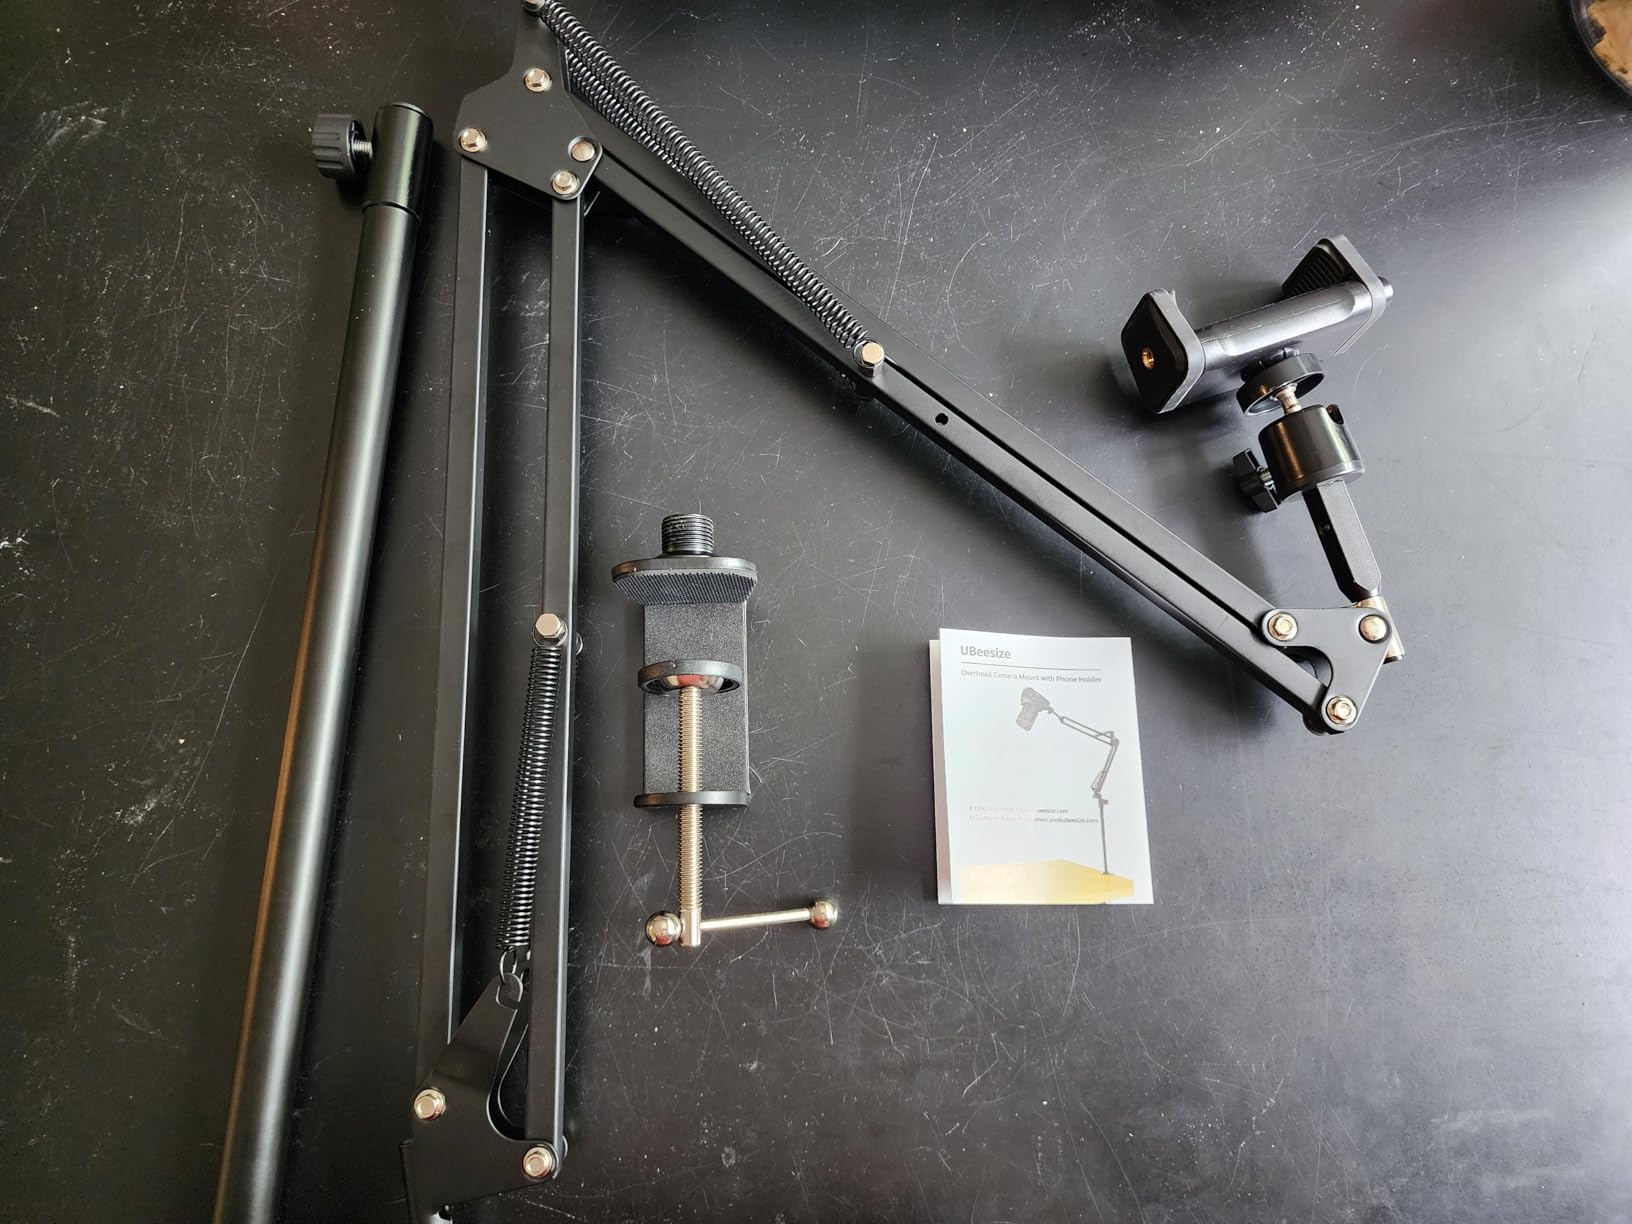
1. DNSbabi 3-Section Articulating Metal Arm – Best Overall for Heavy Cameras
- Exceptional 18lb load capacity in horizontal position
- Top and bottom 360-degree rotation without extra ball head
- Firm gear-locking joints prevent slippage
- Premium metal construction with anodized finish
- Fixed-angle joints limit flexibility
- Phone mount has extremely tight grip
- No traditional height adjustment mechanism
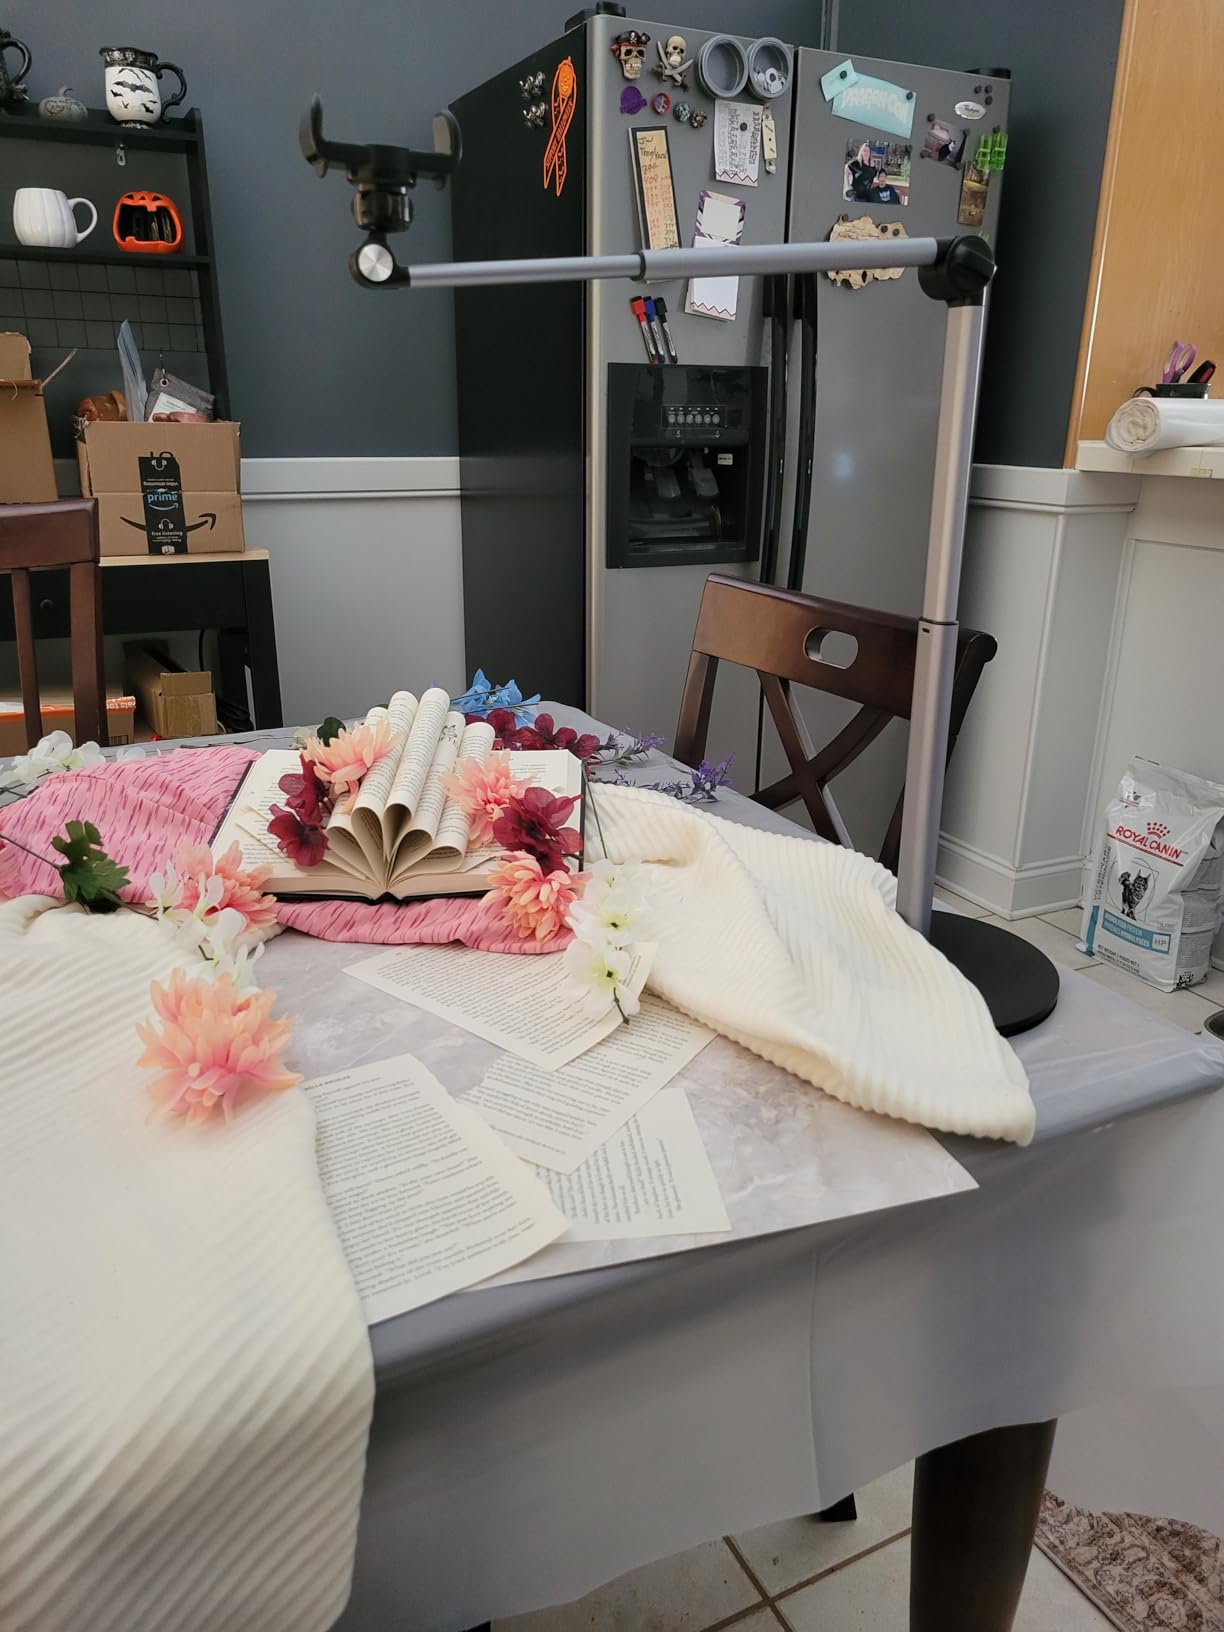
I mounted my Canon DSLR with a 24-70mm lens on the DNSbabi arm, and it held steady at full horizontal extension without a hint of sag. That 18lb horizontal load rating is not marketing fluff. The gear-locking joints click firmly into place, which gave me confidence that my expensive camera was not going to slowly drift during a 40-minute product photography session.
The 3-section design extends to 35.4 inches, giving me plenty of reach across my desk for overhead flat lay work. I really appreciated the built-in 360-degree rotation at both the top and base, because it meant I did not need to buy a separate ball head. That saved me about $25 right there.
What surprised me most was the build quality at this price point. The anodized metal finish feels like something twice the cost. The joints have a satisfying mechanical click when you lock them, and nothing flexed or wobbled even when I tapped the arm during adjustments. After three weeks of daily use, the joints stayed tight with no loosening.
The trade-off is flexibility. The gear-locking joints snap to fixed angles rather than offering infinite adjustment. For my straight-down product shots this was perfect, but if you need a mount that you constantly reposition at odd angles, you might find the clicks frustrating. Also, the phone mount grips so tightly that inserting and removing my phone felt like a workout.
Who Should Buy This Mount
This is my top pick for content creators using DSLRs, mirrorless cameras, or heavy webcam setups. If you shoot product photography, jewelry flat lays, or cooking tutorials with a real camera, the DNSbabi gives you the stability and load capacity you need without spending $200+. It is especially good if your overhead shots are mostly straight-down or at consistent angles.
Setup Time and Desk Compatibility
I had this mount fully assembled and clamped to my desk in under 10 minutes. The C-clamp fits standard desk thicknesses up to about 2 inches. The folded size of 13.8 inches makes it easy to store in a drawer or transport to different shoot locations. Just make sure your desk edge has a flat surface for the clamp to grip properly.
2. JUSMO LS15 Pro Camera Desk Mount – Best for Professional Multi-Device Studios
- Professional metal construction with 22lb load capacity
- Flexible segmented design for customizable length
- Anti-slip pole grooves with laser engraved measurements
- Stable and sturdy for heavy camera setups
- Small lock-screw pieces can be easily lost
- Additional poles sold separately at high cost
- No carry case included
- Desk compatibility issues with uneven corners
The JUSMO LS15 Pro is the mount I reach for when I need to set up a multi-device overhead rig. I clamped my main DSLR on the end, attached a secondary webcam using the super clamp midway down the pole, and even hung a small LED panel off the other segment. The 22lb load capacity handled all of it without complaint.
The segmented pole design is what sets this mount apart from everything else on this list. You can build the exact height and reach you need by adding or removing sections. The anti-slip grooves and laser-engraved tick marks make it easy to reproduce the exact same setup every time you shoot. I found this especially useful when filming a series of product videos where consistency matters.
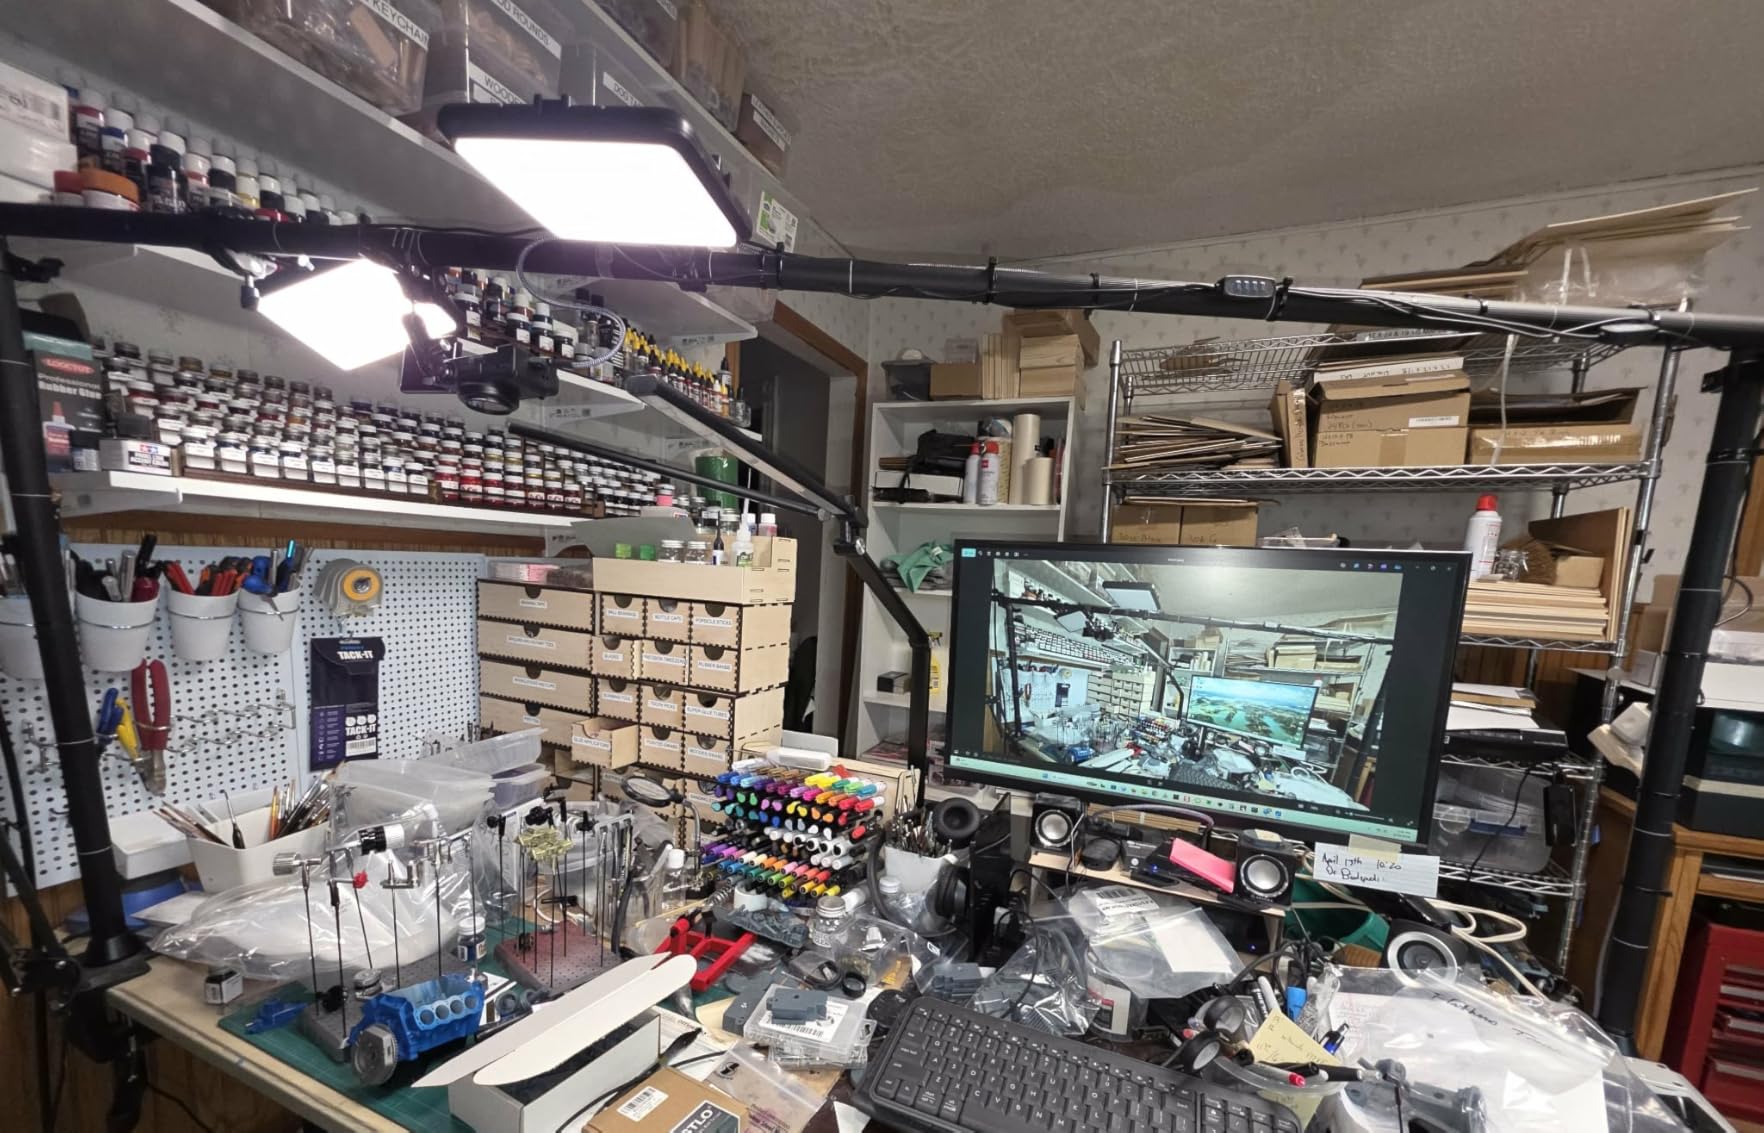
The aluminum construction feels genuinely professional. Nothing about this mount feels cheap or flimsy. The enlarged C-clamp opens up to 90mm, which fit my thick studio desk without any trouble. The corrugated anti-slip poles and secondary anti-deflection locking screws gave me confidence that nothing would shift during a long recording session.
My main gripe is with the small lock-screw pieces. During my first week of use, I nearly lost one twice while breaking down the rig for transport. There is no carry case included, which means you are juggling loose parts. Also, if you want to extend the reach with additional poles, they are sold separately and the pricing adds up quickly.
Best Use Cases for the JUSMO LS15
This mount shines for professional content creators who need to mount multiple devices simultaneously. If you are running a product photography business, streaming with multiple camera angles, or building a studio setup where you film unboxing videos with overhead and side cameras at once, the LS15 gives you the flexibility to create a custom rig. Pair it with a good grip kit for indie filmmakers for maximum versatility.
Long-Term Durability and Maintenance
After two months of daily use, the JUSMO LS15 still feels as solid as day one. The powder-coated aluminum shows no signs of wear, and the locking mechanisms have maintained their grip. I recommend keeping spare Allen wrenches handy since the included one is easy to misplace. Thread-locking compound on the small screws would be a smart upgrade if you assemble and disassemble frequently.
3. DImotliyor 3-Section Flexible Articulating Arm – Best Value for Beginners
- 3-section detachable design for compact storage
- Multiple screw sizes for device compatibility
- 360-degree rotatable base with padded desk clamp
- Sturdy aluminum alloy construction at budget price
- Ball mount can be flimsy under heavier setups
- Joints lock at fixed angles rather than infinite adjustment
- Some wobble reported with heavier DSLRs
For creators just starting out, the DImotliyor 3-section arm is the overhead camera mount I recommend most often. At this price, I was not expecting much, but the aluminum construction feels solid and the included accessories cover almost every mounting scenario. I used it with my phone, a Logitech webcam, and a lightweight mirrorless camera, and it handled all three well.
The standout feature is the variety of screw adapters included. You get 1/4, 3/8, and 5/8 inch threads, which means this mount works with virtually any camera or accessory without buying extra adapters. The 360-degree ball head and included phone holder round out a package that would cost twice as much if you bought each component separately.

I did notice some wobble when I pushed the weight limit with a heavier DSLR and lens combo. The 6lb maximum recommendation is something to take seriously. With my Sony A6000 and a kit lens, the mount was rock solid. With a Canon 80D and a heavy lens, I could see slight movement when I tapped the desk. For phone-based content creation, this is a non-issue.
The detachable 3-section design is great for creators who film in different locations. I packed this mount in my backpack for an off-site cooking video shoot, and it took up less space than my water bottle. Assembly takes about 5 minutes, and the padded desk clamp protects your furniture from scratches.
Ideal Devices and Weight Limits
This mount works best with smartphones, webcams, action cameras, and lightweight mirrorless setups. If your camera and lens combination weighs under 4 pounds, you will have a great experience. The 360-degree ball head gives you plenty of positioning flexibility, and the included phone holder means you can switch between devices without buying additional accessories.
What the Padded Clamp Does Well
The desk clamp on the DImotliyor is padded with rubber grips that protect your desk surface. I clamped it to a glass desk, a wooden table, and a metal workbench during testing, and it held firm on all three. The clamp opens wide enough for most standard desks. The 360-degree rotation at the base lets you swing the arm completely out of the way when you need your desk space back.
4. UBeesize 360 Degree Adjustable Arm – Best for Streaming and Social Media
- Excellent 360-degree positioning with adjustable boom arm
- Tool-free C-clamp setup for quick deployment
- Compact adjustable height from 15 to 35 inches
- Wire guide clips for cable management
- Base and extender pole can be wobbly when fully tightened
- Plastic stalk supporting ball head raises durability concerns
- Clamp depth of 1.5 inches may be insufficient for some desks
The UBeesize mount is built for the TikTok and YouTube creator who needs to set up fast and start recording. I had this mount clamped to my desk and positioned for an overhead shot in under 3 minutes, no tools required. The tool-free C-clamp is a genuine time-saver when you are switching between different shooting setups throughout the day.
I really like the wire guide clips included on this mount. Cable management is one of those things that seems minor until you have a charging cable dangling in front of your lens during a critical shot. The clips keep your phone charger or camera cable routed neatly along the arm, which is a detail most mounts at this price completely ignore.
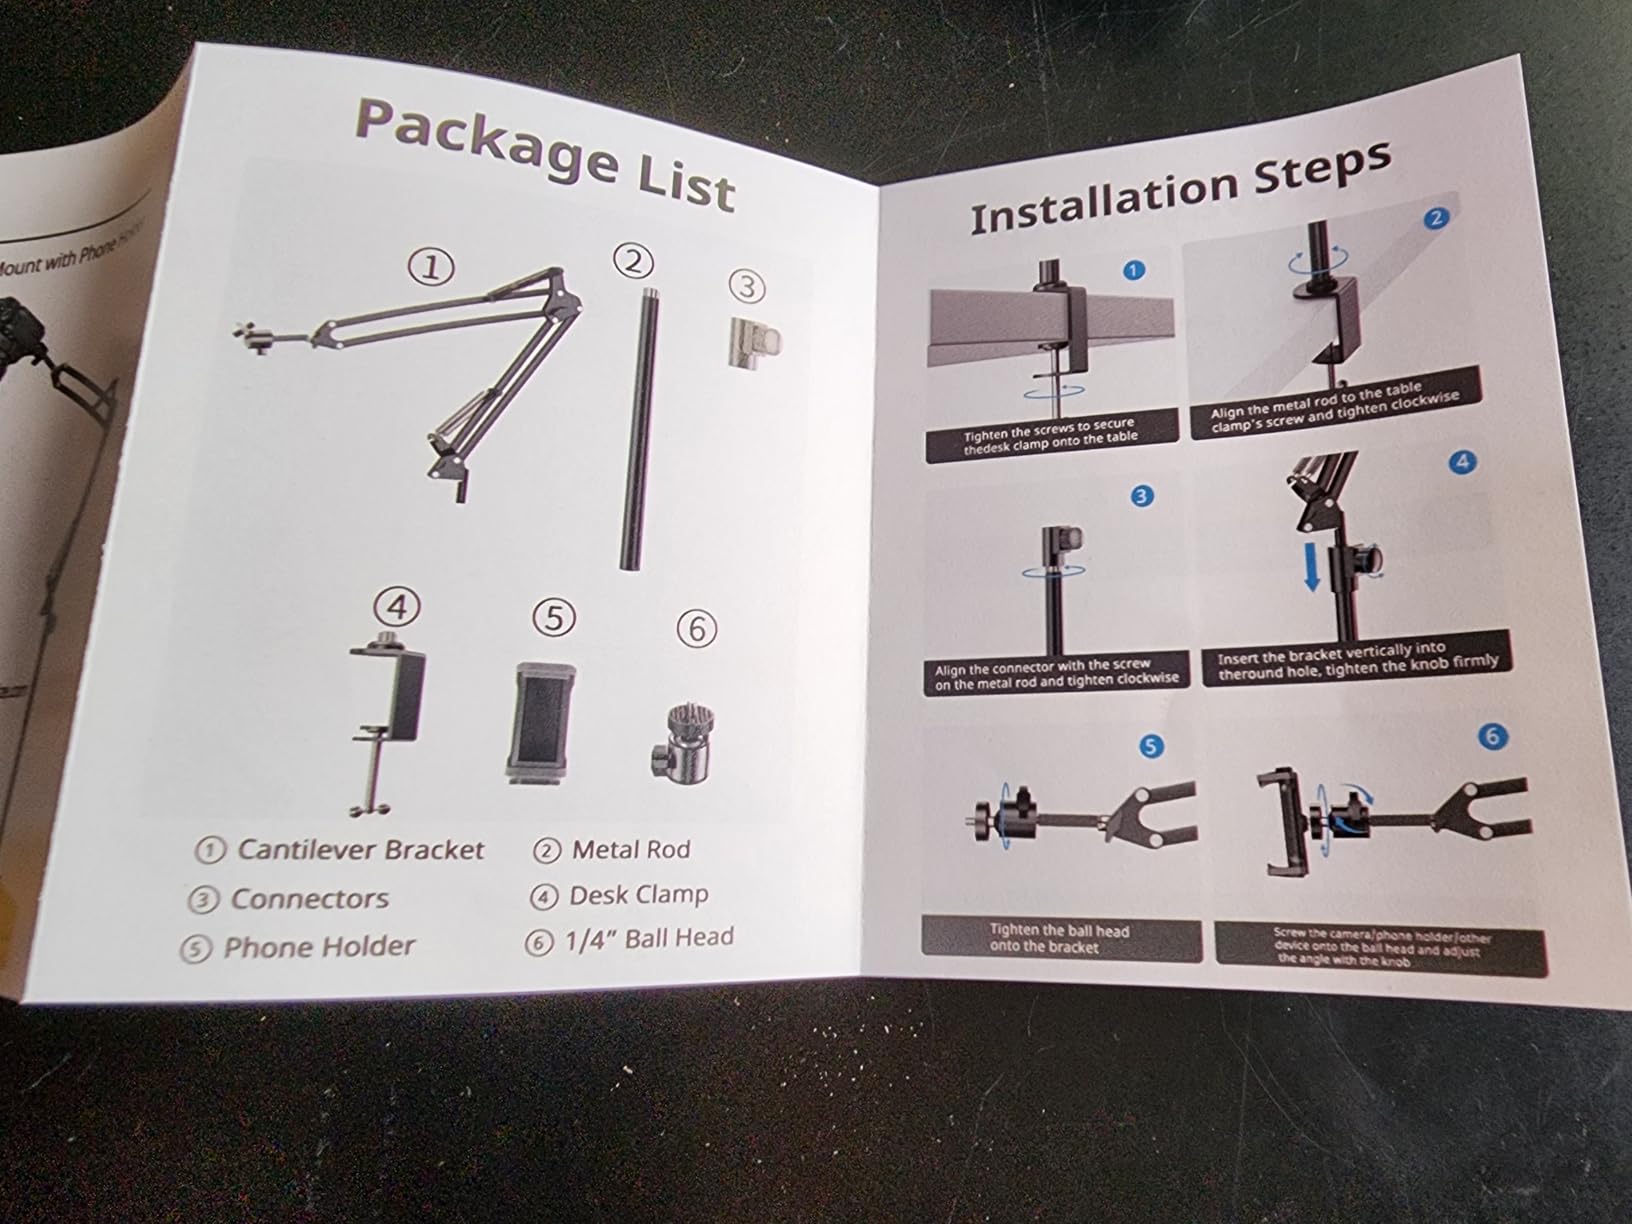
The adjustable height range of 15 to 35 inches covers most desk-based overhead scenarios. I used it for everything from tight product close-ups to wide cooking tutorial shots. The 360-degree boom arm positioning let me find the exact angle I needed without repositioning the entire mount. For phone-based content creation, this mount handles the job comfortably.
The weak point is the extender pole connection. When fully tightened, I still noticed a slight wobble at full extension with my phone attached. The plastic stalk that supports the ball head is a concern for long-term durability. I also found that the clamp depth of 1.5 inches was not deep enough for my thick studio desk, so I had to use it on a secondary table.
Best Content Types for This Mount
The UBeesize excels with lightweight setups for TikTok lives, YouTube Shorts, product demos, and crafting tutorials. If you primarily use a smartphone or webcam for your content, this mount gives you the flexibility and quick-deployment features you need. The cable management system is especially helpful for live streaming where your phone needs to stay charged during long sessions.
How the Clamp System Compares
The tool-free clamp is the fastest setup system I tested. You simply twist the knob by hand and the clamp tightens onto your desk. No Allen wrenches, no small screws to lose. The trade-off is that the 1.5 inch clamp depth is shallower than the JUSMO or DNSbabi mounts. If you have a thick desk or a desk with a lip, you may need to verify compatibility before ordering.
5. InnoGear Overhead Phone Mount – Best for Webcam and Phone Creators
- Heavy sturdy base provides excellent stability
- Easy to assemble with tool-free design
- Versatile compatibility with phones webcams and cameras
- Smooth adjustable joints for multiple angles
- Requires proper weight balancing when arm fully extended
- Adjustment knobs need proper tightening to maintain position
The InnoGear Overhead Phone Mount has the highest rating on this list at 4.8 stars, and after testing it, I understand why. The 3.62 pound metal base is the heaviest in this price range, and it shows. I set up my phone for an overhead cooking video and bumped the counter multiple times during filming. The mount did not budge. That kind of stability is what content creators on Reddit consistently rank as their top priority.
Assembly was completely tool-free, which I appreciated after dealing with Allen wrenches on other mounts. The boom arm detaches easily for storage, and the 180-degree ball head rotation gives you enough range for straight-down shots and angled positions. I tested it with a Logitech C920 webcam, an iPhone, and a small action camera, and all mounted without any adapter issues.
The non-slip base absorbs vibration and prevents scratches on your desk or table. This was noticeable during my testing because I have a wooden desk that tends to transmit every little vibration to my camera. The InnoGear base dampened those micro-movements better than any clamp-mounted option I tested. For creators who film on kitchen counters or craft tables where you cannot clamp a mount, this freestanding design is the solution.
The only adjustment I needed to make was learning to balance the weight when the arm is fully extended. If you extend the arm to its maximum reach with a heavier phone in a case, the base can tilt slightly. Tightening the adjustment knobs firmly solved this for me, but it is something to be aware of. Once locked down, the position held steady for an entire 2-hour live stream.
Freestanding vs Clamp Mount Advantages
The freestanding design of the InnoGear is a major advantage for creators who cannot or do not want to clamp a mount to their work surface. Kitchen counters, craft tables, and delicate desks are all fair game. You also get more placement flexibility because you are not restricted to the edge of your desk. The trade-off is that the base takes up desk space and can appear in your frame if you shoot very wide.
Device Compatibility and Versatility
The universal 1/4 inch thread on this mount means it works with virtually any phone, webcam, or action camera on the market. I tested it successfully with Logitech webcams (C920, C922, BRIO), GoPro cameras, and ring lights. If you are a creator who uses multiple devices for different content types, this mount adapts to all of them without additional purchases.
6. yAyusi Heavy Duty Aluminum Phone Mount – Best Budget Option for Phone Creators
- Heavy 3.3lb weighted base prevents tipping
- Long 13.7-inch retractable arm with 360-degree rotation
- Phone clamp rotates 360 degrees for optimal angles
- 2-year warranty for peace of mind
- Cannot achieve straight-down angle as shown in some photos
- Phone holder blocks part of screen during live streams
- Arm exhibits wobble at full extension with phone attached
The yAyusi phone mount is the budget pick I actually recommend to friends. The 3.3lb weighted base is the feature that sold me, because most phone mounts at this price have lightweight bases that tip the moment you extend the arm. I set this up on my kitchen counter for a cooking video, fully extended the arm, and the base held firm without any counterweight tricks.
The 13.7-inch retractable arm gives you serious reach for a phone-focused mount. I used it to capture overhead shots of a full cutting board layout, and I had room to spare. The phone clamp rotates 360 degrees, so I could switch between portrait for TikTok and landscape for YouTube without remounting my phone. That kind of flexibility at this price is uncommon.
I do need to be honest about the limitations. The arm cannot achieve a perfectly straight-down angle, even though some product photos suggest it can. The closest I got was about 80 degrees from vertical. For flat lay photography where you need a true 90-degree overhead, this is a dealbreaker. For cooking videos, tutorials, and crafting content where a slight angle is acceptable, it works great.
The phone holder also blocks part of the screen, which made it difficult to read viewer comments during a test live stream. The arm showed some wobble at full extension, though tightening the knobs helped minimize it. The 2-year warranty is a nice touch that gives me confidence in the company standing behind their product.
Best Content Scenarios for This Mount
The yAyusi is ideal for phone-based content creators who film cooking videos, crafting tutorials, art demonstrations, and product reviews. If you do not need a true straight-down angle and primarily use your smartphone for content creation, this mount delivers excellent value. It is especially good for creators who film in kitchens or workshops where a clamp mount is not practical.
Arm Extension and Stability Trade-offs
The retractable arm design means you can adjust the reach based on your shooting needs. At shorter extensions, the mount is very stable with minimal wobble. At full 13.7-inch extension, you will notice some movement if you bump the surface. The 3.3lb base does an admirable job of preventing tip-overs, but positioning the arm directly over the base rather than to the side improves stability significantly.
7. LUXSURE Ring Light with Stand – Best All-in-One Lighting and Mount Solution
- Shadow-free lighting with centered phone placement
- 3 color temperatures and 10 brightness levels
- Solid heavy base provides excellent stability
- Bluetooth remote for hands-free recording
- Arm not adjustable as expected for some users
- May tip if light turned to the side
- Wing nut may not secure tightly with phone weight
The LUXSURE is different from every other mount on this list because it solves two problems at once: positioning and lighting. The 10-inch ring light with CRI 95+ gives you natural color reproduction that makes product photos look professional without color correction. I tested it for jewelry photography, and the shadow-free centered design eliminated the harsh shadows I usually fight with side-mounted lights.
Your phone sits in the center of the ring light rather than behind it, which means the light wraps around your subject evenly. I filmed a baking tutorial where I needed both hands free and good lighting on the dough. The LUXSURE handled both requirements in a single piece of equipment. The 3 color temperatures (warm, natural, cool) and 10 brightness levels gave me options for different times of day.
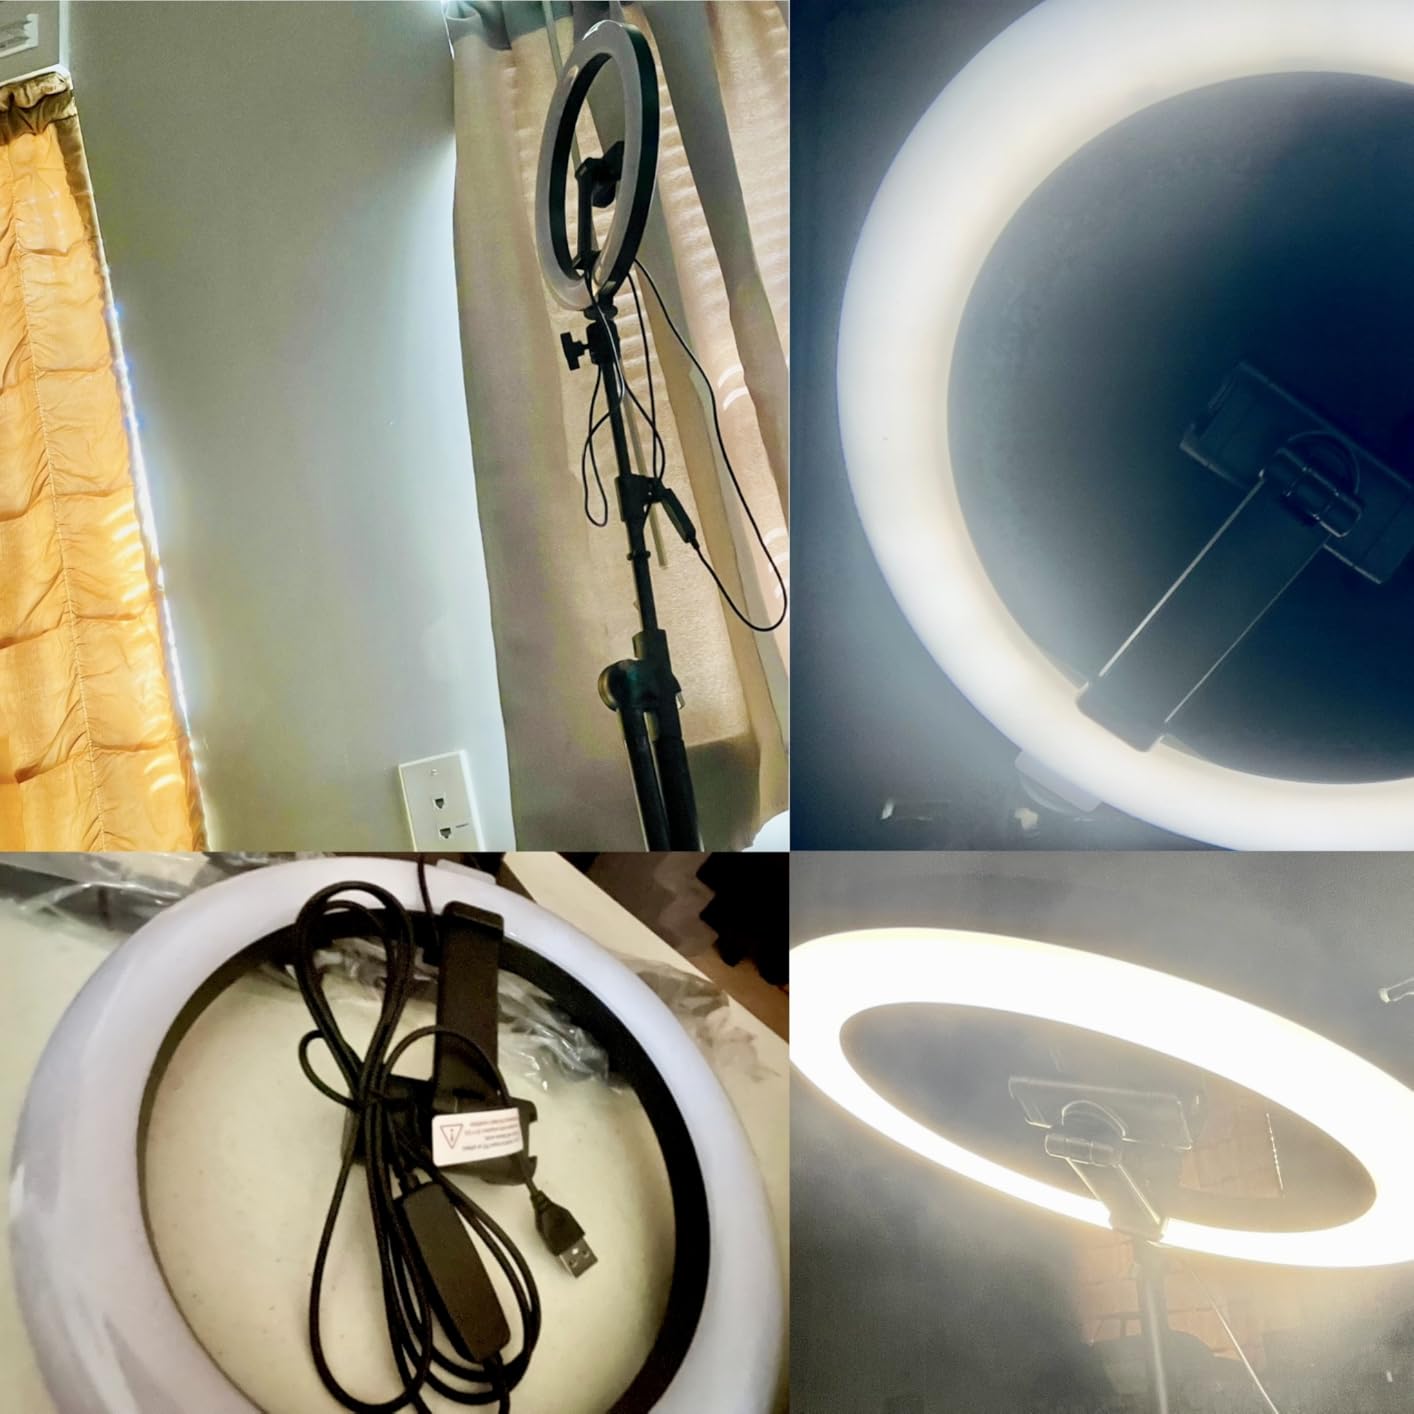
The Bluetooth remote was a pleasant surprise. I used it to start and stop recording without reaching up to touch my phone, which would have shaken the mount. The dual-reinforced weighted base felt stable during my testing, even with the ring light extended to full height. The freestanding design means you can place this on any flat surface without needing a desk edge to clamp onto.
Some users report that the arm is not as adjustable as they expected, and I experienced this too. The wing nut that secures the arm position sometimes needed extra tightening to hold my phone steady at certain angles. When I rotated the light slightly off-center to use it as a side light, the base felt less stable. This is really designed as a straight overhead solution, not a multi-angle lighting rig.
When to Choose an Integrated Lighting Mount
If you are building your first content creation setup and need both a mount and lighting, the LUXSURE saves you money and desk space compared to buying separate components. It is perfect for beauty tutorials, product unboxing videos, and any content where you need consistent, flattering overhead lighting. For more advanced setups, you may want to explore dedicated lighting kits for indie filmmakers alongside a dedicated mount.
Color Temperature and Brightness Performance
The CRI 95+ rating means colors render accurately, which is critical for product photography where color fidelity matters. I compared product photos shot under the LUXSURE light to photos shot under my professional softbox setup, and the color accuracy was impressively close. The warm setting is great for cozy cooking content, while the cool setting works well for tech product reviews. The 10 brightness levels give you enough range to handle everything from dark room shooting to daytime supplementary lighting.
8. HVAYING Overhead Phone and Camera Mount – Best Budget Freestanding Option
- Heavy sturdy metal base for stability
- Strong phone grip holds securely
- Easy to assemble and adjust
- 360-degree rotation for multiple angles
- Base may appear in frame if not adjusted
- Thicker phone cases may not fit
- May tip over with heavier cameras
The HVAYING mount is the most affordable freestanding option on this list, and it delivers solid performance for phone-first content creators. The 1.2kg+ metal base is heavier than I expected at this price point, and it provided good stability during my testing. I used it for a 45-minute crafting tutorial with my phone mounted overhead, and the position held steady throughout.
The 360-degree rotatable phone holder with a universal ball head gives you a lot of positioning flexibility. I was able to switch between overhead shots for the crafting process and angled shots for the final product reveal without remounting. The EVA non-slip mat on the base protected my table surface and added an extra layer of vibration dampening.
The universal 1/4 inch thread means this mount is not limited to phones. I attached a Logitech webcam for a video conference setup, and it worked perfectly. The phone holder accommodates phones from 2.4 to 3.7 inches wide, which covers most modern smartphones. However, my phone in an OtterBox case was too thick to fit, so I had to remove the case first.
The main issue I encountered is that the metal base can appear in your frame if you shoot at wider angles or do not extend the arm high enough. I had to experiment with positioning to keep the base out of my product shots. Also, when I tried mounting a small point-and-shoot camera instead of a phone, the base became tippy. This mount is really designed for phones and webcams, not cameras.
Who This Budget Mount Suits Best
The HVAYING is ideal for content creators, teachers, and hobbyists who need a simple overhead phone mount without spending a lot. It works well for online teaching, crafting demos, cooking videos, and makeup tutorials. If you are just starting your content creation journey and want to test whether overhead shooting works for your content type before investing more, this is a smart first purchase.
Assembly and Storage Convenience
The detachable vertical arm makes this mount easy to store when not in use. I assembled it in about 5 minutes without any tools, and breaking it down took even less time. The base stores flat on a shelf, and the arm separates for compact storage. For creators with limited space who need to set up and break down their filming area regularly, this design is practical and user-friendly.
How to Choose the Best Overhead Camera Mount for Your Setup
Choosing the right overhead camera mount comes down to four key factors: what device you are mounting, where you are filming, how heavy your camera is, and what type of content you create. Let me break down what I learned from testing all eight mounts.
Weight Capacity: Match It to Your Heaviest Setup
This is the single most important spec to check. I saw the consequences of ignoring weight ratings firsthand when a budget mount slowly sagged under my DSLR during a shoot. Always choose a mount rated for at least 20% more than your heaviest camera and lens combination. For DSLR users, the DNSbabi at 18lb and the JUSMO at 22lb are your safest bets. For phone creators, even the lightest mounts on this list will handle your device comfortably.
Remember to factor in accessories too. If you mount a camera, a microphone, and a small light on the same arm, the combined weight adds up fast. The JUSMO LS15 Pro handles multi-device rigs better than anything else here because of its 22lb capacity and segmented design that distributes weight across multiple support points.
Clamp Mount vs Weighted Base: Which Is Right for You
Clamp mounts like the DNSbabi, DImotliyor, and JUSMO attach to the edge of your desk. They are extremely stable, do not take up desk surface space, and can hold heavier loads. The trade-off is that you need a desk or table with a suitable edge to clamp onto. I found that desks with thick tops or metal frames can be tricky for some clamps.
Weighted base mounts like the InnoGear, yAyusi, LUXSURE, and HVAYING sit directly on your work surface. They are more portable, work on any flat surface including kitchen counters, and do not damage your furniture. The trade-off is that the base takes up desk space and may appear in wide shots. For creators who film in multiple locations or on surfaces that cannot be clamped, a weighted base is the better choice.
Adjustability: Rotation, Tilt, and Extension Range
Think about what angles you actually need. For straight-down product photography, you need a mount that can achieve a true 90-degree overhead position. I found that the DNSbabi and JUSMO handled this best because of their rigid joint designs. The yAyusi maxes out at about 80 degrees, which is fine for video but not ideal for flat lay photography.
360-degree rotation at the mount head is valuable if you switch between portrait and landscape shooting. Adjustable arm length matters too. The DImotliyor extends to 35 inches with its 3-section design, while the UBeesize covers 15 to 35 inches with telescoping height adjustment. Think about the size of your workspace and the framing you need before choosing.
Build Material: Aluminum vs Plastic Components
All eight mounts on this list use aluminum for their primary arms, but the difference is in the joints and connection points. The DNSbabi uses gear-locking metal joints that feel indestructible. The UBeesize has a plastic stalk supporting the ball head that raised long-term durability questions during my testing. The JUSMO uses anti-slip grooved poles with secondary locking screws that provide extra security for heavy rigs.
For professional or daily use, I recommend choosing a mount with metal joints throughout. For occasional use with lightweight devices, plastic joint components are acceptable and keep the price down. If you want to build out a full studio, combining your mount with a grip kit and proper backdrop stands will give you a professional setup that lasts for years.
Device Compatibility: Phones, Cameras, and Everything Between
Check the mounting thread before you buy. The universal standard is the 1/4-20 screw thread, which fits most cameras, webcams, and phones with appropriate holders. The DImotliyor goes further by including 1/4, 3/8, and 5/8 inch adapters for maximum compatibility. If you use a Logitech webcam, GoPro, or ring light alongside your phone, make sure the mount you choose includes the right adapters or has them available separately.
For creators exploring alternative overhead solutions, camera jibs for video production offer motorized or counterweighted options for more complex movements. These are overkill for simple desk setups but worth considering for professional studios.
FAQs
What is the best overhead camera mount for content creators?
The DNSbabi 3-Section Articulating Metal Arm is my top pick overall thanks to its 18lb load capacity, gear-locking joints, and 360-degree rotation. For budget-conscious creators, the DImotliyor 3-Section Flexible Arm offers excellent value with multiple screw adapters and a 360-degree ball head. Phone-first creators should consider the InnoGear Overhead Phone Mount for its heavy 3.62lb base and tool-free setup.
How do I set up an overhead camera for product photography?
First, clamp or place your mount on a stable surface at the edge of your workspace. Extend the arm to position your camera directly above your product. Adjust the camera to a 90-degree angle for a true overhead shot. Use manual focus and a small aperture (f/8 or higher) for sharp depth of field. Add diffused lighting from both sides to eliminate shadows. Finally, use the camera timer or a remote shutter to avoid shake when capturing the image.
What features should I look for in an overhead camera mount?
The most important features are weight capacity (rated 20% above your heaviest camera setup), adjustable arm length for your workspace, 360-degree rotation for flexible positioning, solid metal construction with metal joints, and a mounting system (clamp or weighted base) that suits your filming location. Also look for included accessories like phone holders, screw adapters, and cable management clips.
Can I use a smartphone for professional product photography with an overhead mount?
Yes, modern smartphones can produce professional-quality overhead product photos when paired with a stable mount, good lighting, and proper technique. Use a mount with a weighted base or firm clamp to eliminate shake. Add diffused lighting on both sides. Use your phone’s grid feature for alignment and a remote shutter or voice command to avoid touch-induced shake. Edit in post for color correction and cropping.
Should I choose a clamp mount or a weighted base overhead camera mount?
Choose a clamp mount if you have a desk or table with a suitable edge, need to hold heavier cameras, and want to save desk surface space. Choose a weighted base mount if you film on surfaces that cannot be clamped (like kitchen counters), need portability between locations, or want to avoid marking your furniture. Clamp mounts are generally more stable for heavy rigs, while weighted bases offer more placement flexibility.
Final Thoughts on the Best Overhead Camera Mounts for Content Creators
After testing all eight mounts across product photography, cooking tutorials, live streaming, and crafting videos, my top recommendation for most content creators is the DNSbabi 3-Section Articulating Metal Arm. It hits the sweet spot of load capacity, build quality, and price. For professional studios running multiple devices, the JUSMO LS15 Pro is unmatched in its flexibility. And for phone-first creators on a budget, the InnoGear and yAyusi mounts deliver stability and features well above their price points.
The best overhead camera mounts for content creators in 2026 are the ones that match your specific setup, your device weight, and your filming environment. Start with the weight capacity, consider your mounting surface, and choose the adjustability that fits your content style. Whichever mount you choose, you will immediately notice the difference in your production quality once your camera is rock-steady above your workspace.